How to: Replace Clutch in '04 Coupe
Crossfire Clutch Replacement (View Flickr Set)
Special Parts and Tools:
- Jack Stands
- Transmission lift
- 9102 Flywheel locking tool, only if you are going to replace flywheel, or replace rear seal and cover.
- 11-040 LUK Clutch RepKit (2004-2008 Chrysler Crossfire Clutch Kit - 11-040 LUK - Clutch 04-08 Crossfire Clutch Kit - PartsGeek.com)
A. Remove Exhaust(Service Manual 11-5)
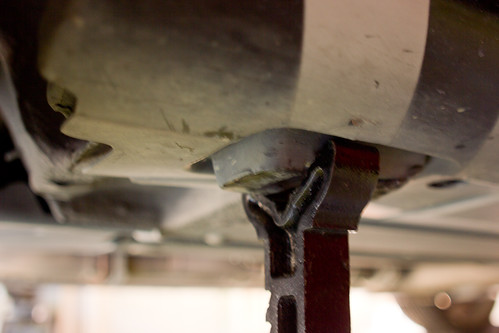
1. Raise and support the vehicle (I always have anxiety about this) Link
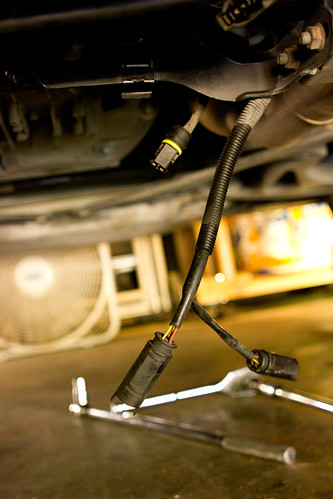
2. Disconnect the oxygen sensor harness connectors (link)
3. Support the exhaust system (good to have the transmission lift at this point)
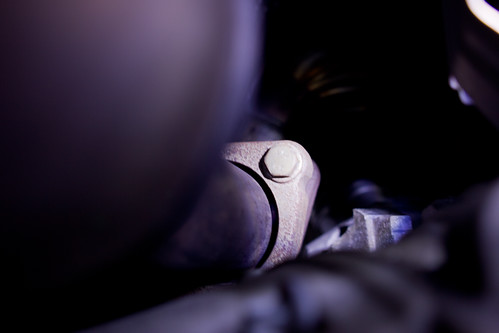
4. Do front flanges, then the back, I left both sections intact (link)
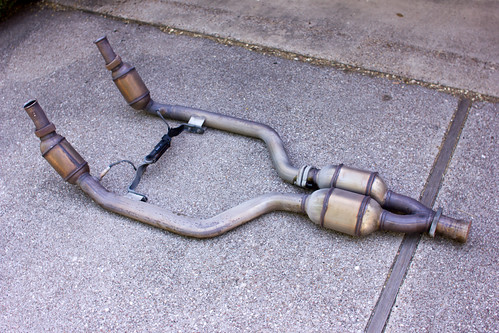
5. Place exhaust system aside (link)
Next Step: Remove Propeller Shaft...
Special Parts and Tools:
- Jack Stands
- Transmission lift
- 9102 Flywheel locking tool, only if you are going to replace flywheel, or replace rear seal and cover.
- 11-040 LUK Clutch RepKit (2004-2008 Chrysler Crossfire Clutch Kit - 11-040 LUK - Clutch 04-08 Crossfire Clutch Kit - PartsGeek.com)
A. Remove Exhaust(Service Manual 11-5)

1. Raise and support the vehicle (I always have anxiety about this) Link

2. Disconnect the oxygen sensor harness connectors (link)
3. Support the exhaust system (good to have the transmission lift at this point)

4. Do front flanges, then the back, I left both sections intact (link)

5. Place exhaust system aside (link)
Next Step: Remove Propeller Shaft...
Last edited by aallman72; 06-04-2012 at 09:29 PM. Reason: added Flickr links
Remove Propeller Shaft (Service Manual 3-26)

6. Remove the center exhaust heat shield nuts and the center heat shield.
7. Remove the rear transmission tunnel support bracket bolts and the bracket.
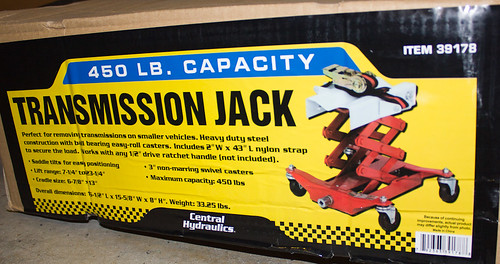
8. Support the transmission with a lift/jack (link)
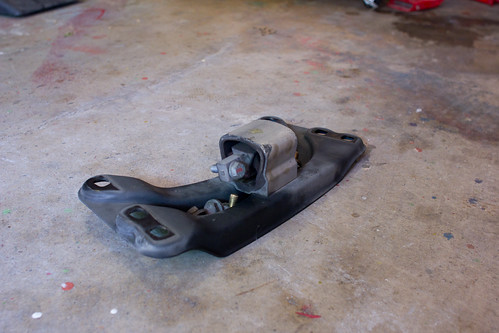
9. Remove the transmission mount bolts, cross member bolts and cross member. (link)
10. Mark the location of the front and rear propeller shaft flange to the transmission output flange and the rear axle pinion flange to maintain proper balance of the drive line.” Using a paint pen (I used testers white and a toothpick), make a mark, like a line, on the transmission flange (triangle thingy with 3 bolts going to transmission) and a matching mark (line) on the rubber donut connecting thingy. Make another mark (dot) on the prop shaft flange and matching (dot) on the rubber donut. Repeat for rear section.

11. Remove prop shaft connecting bolts, front and rear (link)
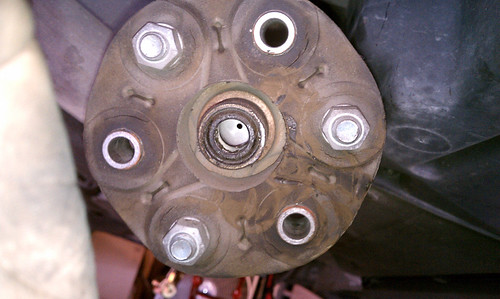
12. Now the hard part, with all the bolts removed I had to pry the ends of the prop shaft away from the rear axle and transmission flanges. They move but you really gotta want it. This would have also been a great time to replace the flex discs (donuts). You can see the cracking around the bolt holes but I left mine alone. Maybe when I replace that leaky end cover (link)
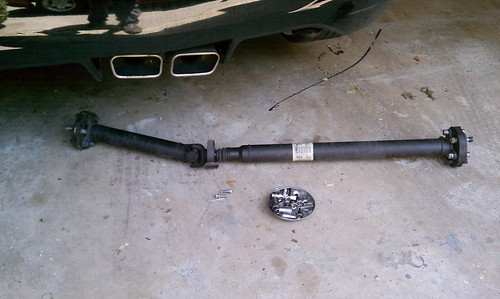
13. Remove the center bearing bracket bolts, remove the propeller shaft from the vehicle at least one donut needs to be off, I removed the front one. (link)
Up Next: Removing the Transmission...

6. Remove the center exhaust heat shield nuts and the center heat shield.
7. Remove the rear transmission tunnel support bracket bolts and the bracket.

8. Support the transmission with a lift/jack (link)

9. Remove the transmission mount bolts, cross member bolts and cross member. (link)
10. Mark the location of the front and rear propeller shaft flange to the transmission output flange and the rear axle pinion flange to maintain proper balance of the drive line.” Using a paint pen (I used testers white and a toothpick), make a mark, like a line, on the transmission flange (triangle thingy with 3 bolts going to transmission) and a matching mark (line) on the rubber donut connecting thingy. Make another mark (dot) on the prop shaft flange and matching (dot) on the rubber donut. Repeat for rear section.

11. Remove prop shaft connecting bolts, front and rear (link)

12. Now the hard part, with all the bolts removed I had to pry the ends of the prop shaft away from the rear axle and transmission flanges. They move but you really gotta want it. This would have also been a great time to replace the flex discs (donuts). You can see the cracking around the bolt holes but I left mine alone. Maybe when I replace that leaky end cover

13. Remove the center bearing bracket bolts, remove the propeller shaft from the vehicle at least one donut needs to be off, I removed the front one. (link)
Up Next: Removing the Transmission...
Last edited by aallman72; 06-04-2012 at 09:37 PM. Reason: added Flickr links
Remove the Transmission (Service Manual 21-345)
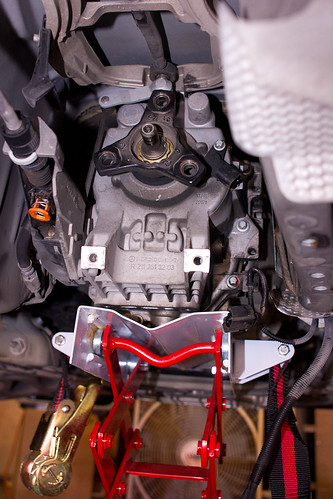
14. Disconnect the backup lamp switch harness connector. (link)

15. Disconnect the pressure line at the clutch slave cylinder, remove clip. Remove the retaining bolt and the pressure line from the transmission. Very hard to get into and fluid will start leaking from that line, may be best to have a cap/plug ready to block the line otherwise you get hydraulic fluid in your hair which is not good.

16. Disconnect the reverse lockout cable by turning the locking nut counter clockwise. Remove the cable end from the ball stud (tough) and position the cable aside. Disconnect the ground cable at the transmission. I made the mistake of pushing in the orange reverse lockout adjustment button screwing up my 1st gear.
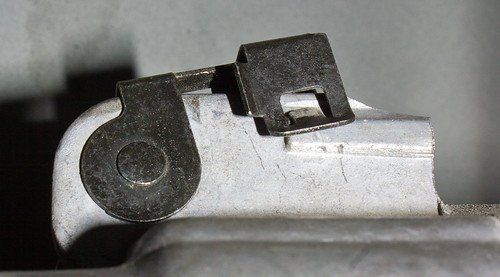
17. Not in Service Manual: Remove shifter hinge pin above and in front of the shift rod on transmission. Lowering transmission without removal may bend/break shifter fork thingy.(link)
18. Remove the transmission to engine retaining bolts. I did this slowly loosening each one a bit at a time as to not put pressure on any one section. It is time consuming and difficult to reach all of them.
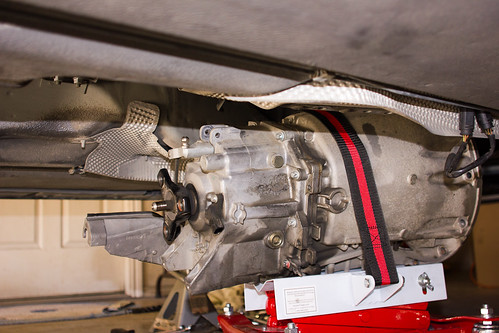
19. Move transmission back and then lower it down and away from clutch cover.(link)
Next: Removing Clutch Cover...

14. Disconnect the backup lamp switch harness connector. (link)

15. Disconnect the pressure line at the clutch slave cylinder, remove clip. Remove the retaining bolt and the pressure line from the transmission. Very hard to get into and fluid will start leaking from that line, may be best to have a cap/plug ready to block the line otherwise you get hydraulic fluid in your hair which is not good.

16. Disconnect the reverse lockout cable by turning the locking nut counter clockwise. Remove the cable end from the ball stud (tough) and position the cable aside. Disconnect the ground cable at the transmission. I made the mistake of pushing in the orange reverse lockout adjustment button screwing up my 1st gear.

17. Not in Service Manual: Remove shifter hinge pin above and in front of the shift rod on transmission. Lowering transmission without removal may bend/break shifter fork thingy.(link)
18. Remove the transmission to engine retaining bolts. I did this slowly loosening each one a bit at a time as to not put pressure on any one section. It is time consuming and difficult to reach all of them.

19. Move transmission back and then lower it down and away from clutch cover.(link)
Next: Removing Clutch Cover...
Last edited by aallman72; 06-04-2012 at 09:45 PM. Reason: added Flickr links
Removing the Clutch Cover, Disc
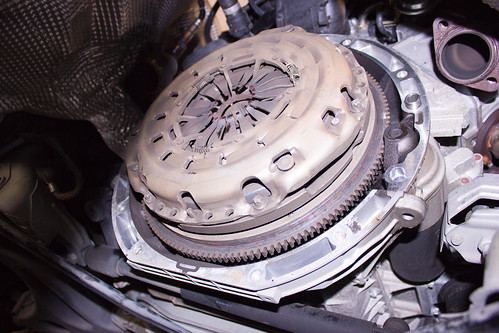
20. Remove clutch cover bolts 1 to 1 1/2 turns at a time, in a star pattern. Making sure they come off evenly as to not warp the clutch disc. (link)
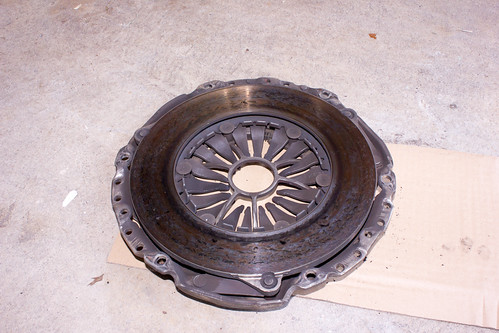
21. Remove cover/pressure plate, warning its heavy. I used a rubber mallet to loosen. (link)
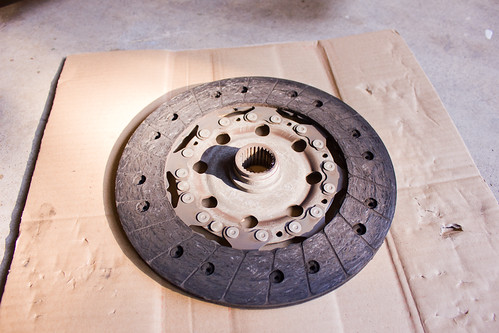
22. Remove clutch disc (link)
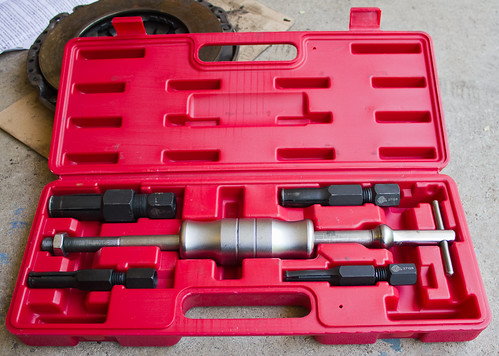
23. WARNING, do not try to remove pilot bearing with blind hole puller as stated in service manual. On a Dual mass flywheel you will only destroy it (link)
Like I did...
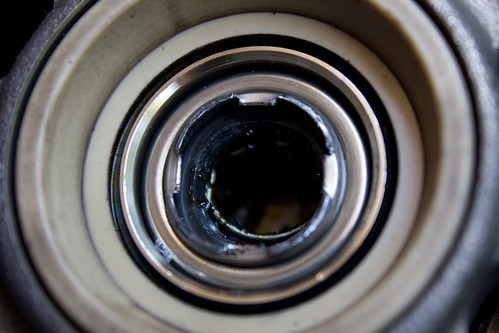
Destroyed Pilot bearing(link)
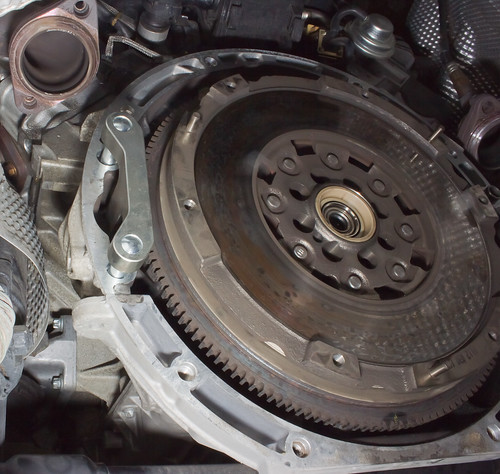
At this point it became necessary to remove flywheel. (link)
Up Next: Removing Flywheel...

20. Remove clutch cover bolts 1 to 1 1/2 turns at a time, in a star pattern. Making sure they come off evenly as to not warp the clutch disc. (link)

21. Remove cover/pressure plate, warning its heavy. I used a rubber mallet to loosen. (link)

22. Remove clutch disc (link)

23. WARNING, do not try to remove pilot bearing with blind hole puller as stated in service manual. On a Dual mass flywheel you will only destroy it (link)
Like I did...

Destroyed Pilot bearing(link)

At this point it became necessary to remove flywheel. (link)
Up Next: Removing Flywheel...
Last edited by aallman72; 06-04-2012 at 09:50 PM.
Removing/Replacing Flywheel, Disc, Cover
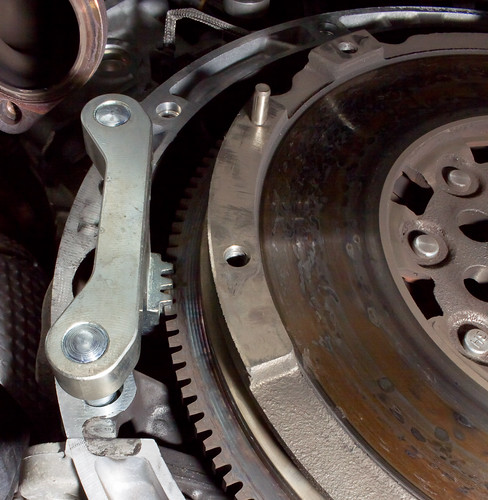
24. Lock flywheel with special tool 9102 (link)
25. Remove and discard the flywheel bolts, new ones should be used as torque pressure is too great to reuse old bolts.
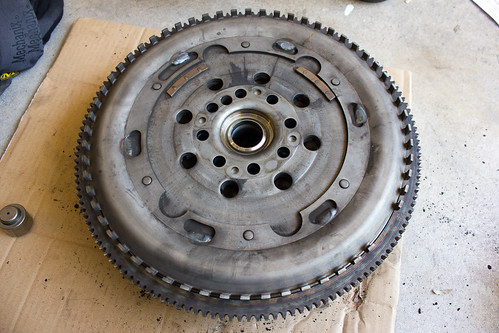
26. WARNING: Heavy! Remove dual mass flywheel, had to use rubber mallet to loosen from crankshaft. Remove special locking tool. I also hammered out old/destroyed pilot bearing with hammer and socket. I replaced the bearing with the new one provided in the LUK 11-040 Clutch Rep Kit by banging in a new one using a similarly sized socket. Probably better to use some kind of bearing press for this.(link)
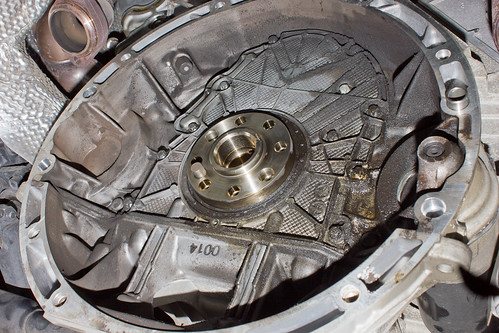
27. At this point I noticed my rear end cover was leaking, rather than replacing both the cover and rear seal I opted to tighten cover bolts and reinstall old flywheel. (Service manual states: The rear crankshaft oil seal cannot be replaced separately. The end cover and seal must be replaced as a set.) It also states you should use “Loctite 5203 sealer” as a gasket for the end cover, which was very hard to find and not cheap. (link)
28. Clean flywheel surface to remove debris. Scuff old flywheel with 180 grit disc to remove glazing and prep for new clutch disc. Clean out debris from sanding, I think brake cleaner is recommended.
29.Replacing flywheel is a *****, its heavy and tight fitting and hard to get into position. Once I finally got it lined up properly, I used a rubber mallet to bang it on before replacing bolts with new ones. I used blue loctite, but many people suggest red for flywheels.
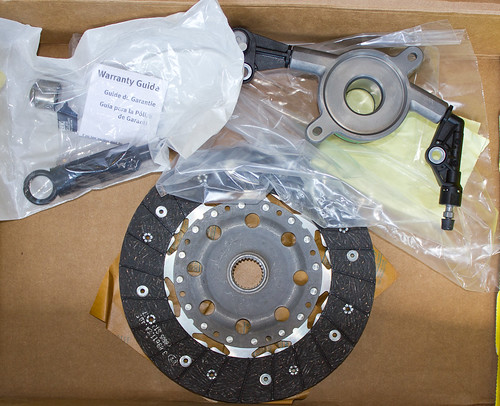
30. Scuff new clutch cover/pressure plate with 180 grit disc sander and clean to remove oil. Place clutch disc in position on flywheel, use alignment tool to center disc. Leave tool in place. Tool comes with LUK RepKit. (link)
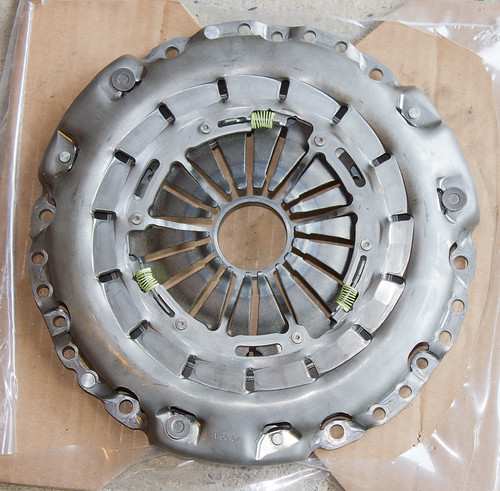
31. Place new clutch cover on flywheel, it will NOT sit flush with flywheel, you need to repeat the removal process in reverse by installing cover bolts and hand tightening each evenly, then wrench them each 1 to ½ turns at a time until cover seats to flywheel. You’ll notice the fingers slowly begin to retract. (link)
32. Remove alignment tool.
33. Lubricate transmission input splines with provided spline grease sparingly; I used a brush to evenly distribute lubricant.
Stay Tuned for: Slave Cylinder...

24. Lock flywheel with special tool 9102 (link)
25. Remove and discard the flywheel bolts, new ones should be used as torque pressure is too great to reuse old bolts.

26. WARNING: Heavy! Remove dual mass flywheel, had to use rubber mallet to loosen from crankshaft. Remove special locking tool. I also hammered out old/destroyed pilot bearing with hammer and socket. I replaced the bearing with the new one provided in the LUK 11-040 Clutch Rep Kit by banging in a new one using a similarly sized socket. Probably better to use some kind of bearing press for this.(link)

27. At this point I noticed my rear end cover was leaking, rather than replacing both the cover and rear seal I opted to tighten cover bolts and reinstall old flywheel. (Service manual states: The rear crankshaft oil seal cannot be replaced separately. The end cover and seal must be replaced as a set.) It also states you should use “Loctite 5203 sealer” as a gasket for the end cover, which was very hard to find and not cheap. (link)
28. Clean flywheel surface to remove debris. Scuff old flywheel with 180 grit disc to remove glazing and prep for new clutch disc. Clean out debris from sanding, I think brake cleaner is recommended.
29.Replacing flywheel is a *****, its heavy and tight fitting and hard to get into position. Once I finally got it lined up properly, I used a rubber mallet to bang it on before replacing bolts with new ones. I used blue loctite, but many people suggest red for flywheels.

30. Scuff new clutch cover/pressure plate with 180 grit disc sander and clean to remove oil. Place clutch disc in position on flywheel, use alignment tool to center disc. Leave tool in place. Tool comes with LUK RepKit. (link)

31. Place new clutch cover on flywheel, it will NOT sit flush with flywheel, you need to repeat the removal process in reverse by installing cover bolts and hand tightening each evenly, then wrench them each 1 to ½ turns at a time until cover seats to flywheel. You’ll notice the fingers slowly begin to retract. (link)
32. Remove alignment tool.
33. Lubricate transmission input splines with provided spline grease sparingly; I used a brush to evenly distribute lubricant.
Stay Tuned for: Slave Cylinder...
Last edited by aallman72; 06-04-2012 at 10:27 PM.
Replace Slave Cylinder
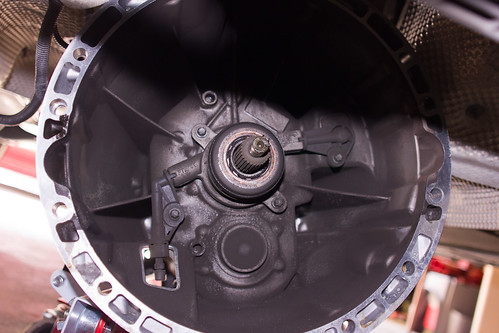
34. Remove old Slave Cylinder/Release Bearing unit
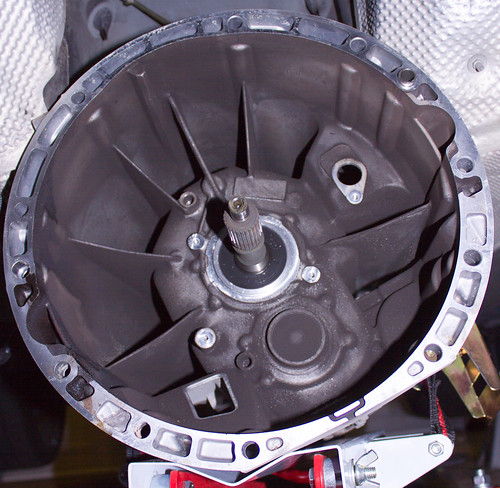
Slave Cylinder removed
35. Make sure the new Slave cylinder moves in and out easily. Mine did not. I had to force the cylinder in so it would operate properly. Install new Slave Cylinder to transmission.
36. At this point I pushed in the slave cylinder and re-connected it to the supply line, and released it to “suck up” some fluid. Re-attached the pressure line c-clamp to the transmission; the cable flexes enough to do this if its close enough to the car body.
37. The bleed valve on the slave cylinder seems kind of loose once it’s open just a little. To prevent air getting sucked up into it via the screw threads I placed a bead of thick grease around the valve threads where it meets the assembly.
38. You’ll need a container partially filled with hydraulic(in this case Dot-4 brake) fluid in it as a precaution to prevent air being sucked up into the slave cylinder. And an assistant. Although I suppose you could use a hose clamp to hold the slave cylinder in.
39. Connect a tube to the bleed valve and put it into the container of fluid. Make sure the brake fluid reservoir in the engine bay is filled with fluid. Loosen the bleed valve. Press in the slave cylinder by hand, can be hard to do. You will see fluid and some bubbles exit the tube into the container of brake fluid.
40. While holding in cylinder have assistant slowly press the clutch pedal in "by hand" until its depressed all the way. Close bleed valve. Release cylinder, pull up pedal from floor. Add Brake fluid to reservoir if necessary, repeat process if you feel there still may be air bubble in the line.
Summary: Loosen valve, push in slave and hold, assistant slowly pushed in clutch pedal by hand. Lock bleed valve, release slave, pull out pedal. Repeat.
Up Next: Mount Transmission back to Engine Block...

34. Remove old Slave Cylinder/Release Bearing unit

Slave Cylinder removed
35. Make sure the new Slave cylinder moves in and out easily. Mine did not. I had to force the cylinder in so it would operate properly. Install new Slave Cylinder to transmission.
36. At this point I pushed in the slave cylinder and re-connected it to the supply line, and released it to “suck up” some fluid. Re-attached the pressure line c-clamp to the transmission; the cable flexes enough to do this if its close enough to the car body.
37. The bleed valve on the slave cylinder seems kind of loose once it’s open just a little. To prevent air getting sucked up into it via the screw threads I placed a bead of thick grease around the valve threads where it meets the assembly.
38. You’ll need a container partially filled with hydraulic(in this case Dot-4 brake) fluid in it as a precaution to prevent air being sucked up into the slave cylinder. And an assistant. Although I suppose you could use a hose clamp to hold the slave cylinder in.
39. Connect a tube to the bleed valve and put it into the container of fluid. Make sure the brake fluid reservoir in the engine bay is filled with fluid. Loosen the bleed valve. Press in the slave cylinder by hand, can be hard to do. You will see fluid and some bubbles exit the tube into the container of brake fluid.
40. While holding in cylinder have assistant slowly press the clutch pedal in "by hand" until its depressed all the way. Close bleed valve. Release cylinder, pull up pedal from floor. Add Brake fluid to reservoir if necessary, repeat process if you feel there still may be air bubble in the line.
Summary: Loosen valve, push in slave and hold, assistant slowly pushed in clutch pedal by hand. Lock bleed valve, release slave, pull out pedal. Repeat.
Up Next: Mount Transmission back to Engine Block...
Last edited by aallman72; 06-03-2012 at 08:22 PM.
Install Transmission. (Service Manual 21-347)
41. Raise transmission up using the lift and fit input shaft into pilot bearing. This part took a while. Just getting the input shaft into the pilot bearing through the disc splines was a challenge. Also since the slave cylinder is extended there won’t be much room to start threading the transmission bolts into the engine block. Once all the bolts are threaded, tighten each one a little at a time as not to apply pressure to one area potentially damaging something.
42. Install the rear cross member together with the transmission mount and install the bolts. I think you can remove transmission lift at this point.
43. Connect shift hinge thingy to transmission with mystery locking pin. Connect the shift rod to the transmission ball stud. Much easier getting on than removing. Connect the reverse lockout cable, Ball stud and twisty mount. Also easier than removing. Connect the backup lamp switch harness connector.
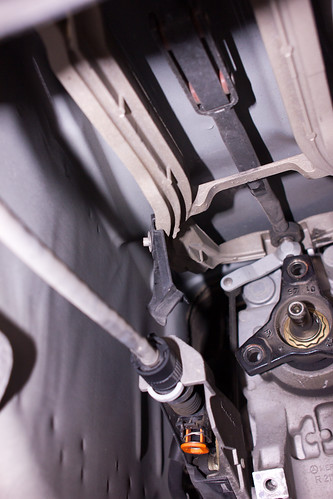
44. At this point I started the car and tested transmission and clutch. Really loud without exhaust attached. I could get into all the gears except 1st. This is because I screwed up and pressed in the reverse lockout cable during removal. Turned off engine. Basically it wouldn’t reach first so I put it in neutral, pressed in the orange release button until it locked. Then moved the underside of the shifter towards the driver’s side about an inch then released orange lockout adjustment catch, locking it into position. That did the trick, could get into all gears no problems.
45. Install the propeller shaft. Line up markings you made when removing.
46. Install exhaust. Connect oxygen sensor harness connectors.
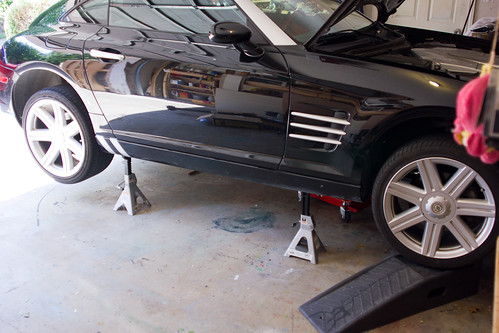
47. Lower car.
Drive away happy!
41. Raise transmission up using the lift and fit input shaft into pilot bearing. This part took a while. Just getting the input shaft into the pilot bearing through the disc splines was a challenge. Also since the slave cylinder is extended there won’t be much room to start threading the transmission bolts into the engine block. Once all the bolts are threaded, tighten each one a little at a time as not to apply pressure to one area potentially damaging something.
42. Install the rear cross member together with the transmission mount and install the bolts. I think you can remove transmission lift at this point.
43. Connect shift hinge thingy to transmission with mystery locking pin. Connect the shift rod to the transmission ball stud. Much easier getting on than removing. Connect the reverse lockout cable, Ball stud and twisty mount. Also easier than removing. Connect the backup lamp switch harness connector.

44. At this point I started the car and tested transmission and clutch. Really loud without exhaust attached. I could get into all the gears except 1st. This is because I screwed up and pressed in the reverse lockout cable during removal. Turned off engine. Basically it wouldn’t reach first so I put it in neutral, pressed in the orange release button until it locked. Then moved the underside of the shifter towards the driver’s side about an inch then released orange lockout adjustment catch, locking it into position. That did the trick, could get into all gears no problems.
45. Install the propeller shaft. Line up markings you made when removing.
46. Install exhaust. Connect oxygen sensor harness connectors.

47. Lower car.
Drive away happy!
The following users liked this post:
×Crossfire1× (09-24-2023)
That's great and an important addition to the knowledge base here. Five stars for you.
Are you going to turn it into a PDF file? I'll do it for you sometime if you want. That way it's easier to print out.
I think you could add that it may be a good time to replace the flex disks in the drive shaft if they show signs of cracking.
The blind hole puller is used when the pilot bearing is in the crankshaft which is where it is shown in the manual if I remember correctly. Another error in the manual.

Last edited by onehundred80; 06-18-2012 at 11:06 PM.
I drove up onto those ramps first, then jacked up the back from the rear diff. and placed the rear jack stands.
Then I jacked up the front more using the front cross member. and then placed the front jack stands.
I left the ramps there(turned sideways a bit) for a little insurance.
I lowered it using the same process in reverse, Finally driving it off the ramps.
Then I jacked up the front more using the front cross member. and then placed the front jack stands.
I left the ramps there(turned sideways a bit) for a little insurance.
I lowered it using the same process in reverse, Finally driving it off the ramps.
Great post! My only comment is that beware of PartsGeek.com. Check out the BB in New Jersey for this company. I ordered the SACHS clutch kit for $735 and they put LUK parts in the SACHS box. The Luk kit goes for $360. Total crooks! I've been trying to reach them without avail. I called the Better Business Bureau and mentioned the vendor. All I got a was laughter...They are very aware of this vendor Parts Geek Review - Auto Parts & Supplies - Wholesale & Manufacturers in Marlton, NJ - BBB Business Review - BBB serving BBB of New Jersey. I'm filing my complaint today.
Great post! My only comment is that beware of PartsGeek.com. Check out the BB in New Jersey for this company. I ordered the SACHS clutch kit for $735 and they put LUK parts in the SACHS box. The Luk kit goes for $360. Total crooks! I've been trying to reach them without avail. I called the Better Business Bureau and mentioned the vendor. All I got a was laughter...They are very aware of this vendor Parts Geek Review - Auto Parts & Supplies - Wholesale & Manufacturers in Marlton, NJ - BBB Business Review - BBB serving BBB of New Jersey. I'm filing my complaint today.
That's a good question. I'm keeping this car for the long haul so it was easy to go with Sachs. It was also recommended by Chrysler as well as Aamco. The stealership quoted me $1,400 for the clutch kit. I've seen some other internet site besides Partsgeek.com that sell for around $750. The LUK looks pretty cheap (throwout bearing) and the Aamco mechanic concurred. Sometimes, I like to drive the XF hard and its nice to know the clutch can take it.
That's a good question. I'm keeping this car for the long haul so it was easy to go with Sachs. It was also recommended by Chrysler as well as Aamco. The stealership quoted me $1,400 for the clutch kit. I've seen some other internet site besides Partsgeek.com that sell for around $750. The LUK looks pretty cheap (throwout bearing) and the Aamco mechanic concurred. Sometimes, I like to drive the XF hard and its nice to know the clutch can take it.


