When you click on links to various merchants on this site and make a purchase, this can result in this site earning a commission. Affiliate programs and affiliations include, but are not limited to, the eBay Partner Network.
Flushing the clutch fluid
January 8, 2024.
After finishing the brake hoses and flushing the brake fluid, I proceeded to flush the clutch fluid. The clutch fluid is the same as the brake fluid.
They feed from the same reservoir. I used the gravity procedure.
Here are pictures with captions of how I did the work on my car.
Last edited by M60A3Driver; 04-07-2024 at 02:04 AM.
How did you ID and prioritize your maintenance projects. I.E. were shocks replaced due to ride/handling, leaking, 46k miles, etc.
Just beginning a similar journey with a 32k SRT Roadster and would appreciate your insight.
How did you ID and prioritize your maintenance projects. I.E. were shocks replaced due to ride/handling, leaking, 46k miles, etc.
Just beginning a similar journey with a 32k SRT Roadster and would appreciate your insight.
Hi, thanks for asking.
I was doing preventative maintenance. My car is all original as far as I can tell. Nothing has been changed on it except the oil, oil filter, and air filters.
When I brought the car home the first things I replaced were the oil filter, oil, cabin filter and air filters. when November hit, I put the car up on jack stands and made a list of everything I wanted to change. Safety items were the first priority.
I knew the car was going to be in the air for a while so I just did everything that required the wheels to be off. (Shocks, brake pads, brake discs, brake hoses, Steering stabilizer, ground wires, replaced differential oil, flushed the brake and clutch fluids).
I will be posting more soon: Breather cover gaskets, valve cover gaskets, spark plugs & plug wires, coil wire plugs, idler pulley, tensioner, serpentine belt, tensioner shock (manual cars only), breather hoses, windshield replacement, and more.
If I can help in any way let me know.
John
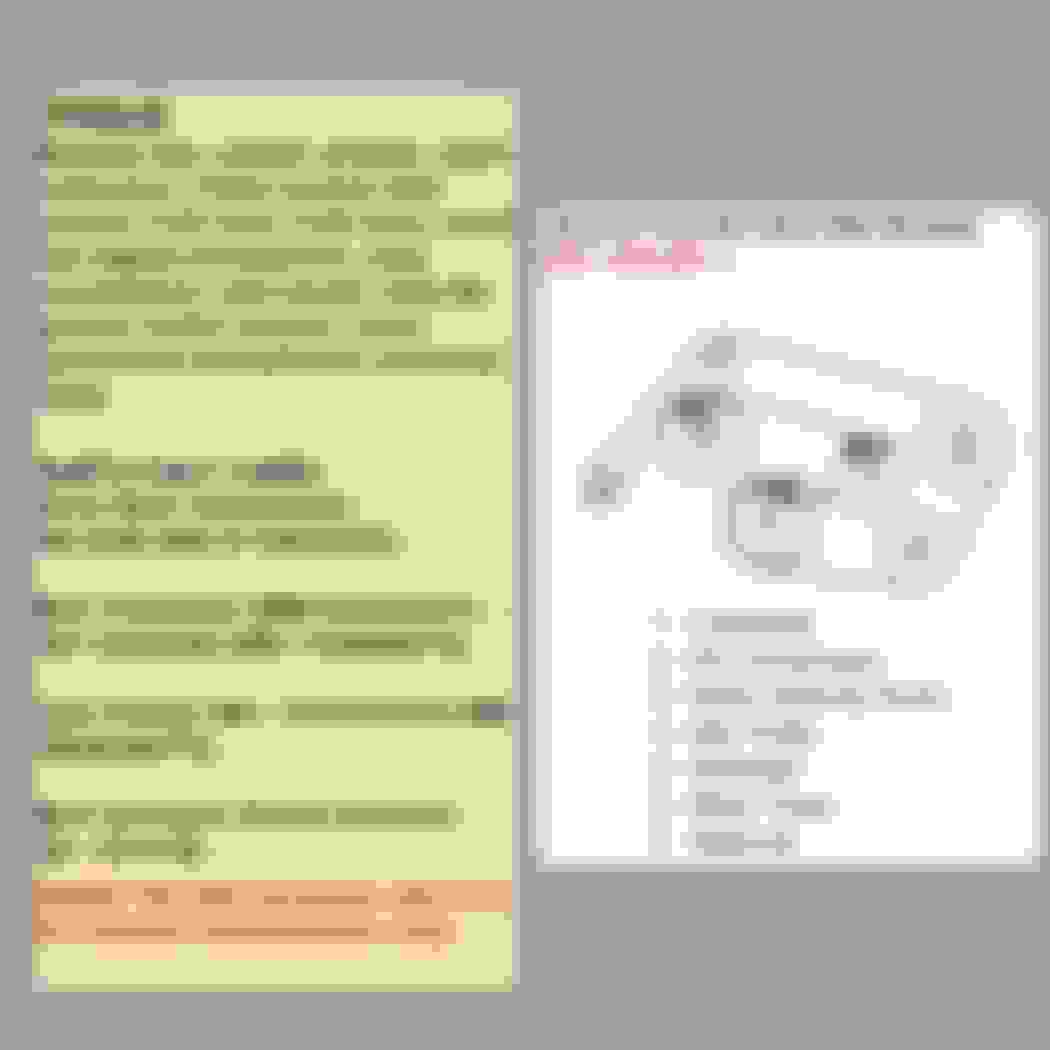
Differential oil change
Svengoolie gets his proctology exam
January 9, 2024.
Another thing that I wanted to get done while I had the car on stands was to change the differential gear oil.
This is how I did it:
I wheely appreciate some of the tools that I have found!
Mounting the refurbished wheels.
January 12, 2024.
I had all four wheels refurbished in November of 2023. Apparently the previous owner was attracted to curbs.
I used a local shop in Fairfield, NJ. They only took a day and they did a great job! I bought the wheels home on November 22, 2023, but I wasn't ready to put them on yet.
I had a bunch of other projects going on.
Fast forward to January 12, 2024.
Here's how I used another great tool that made the job so easy!
I made one a few years ago. Bought a 6� bolt, cut the head off and rounded the cut end with a grinder. It sure makes it easier for an old guy to install a wheel and tire.
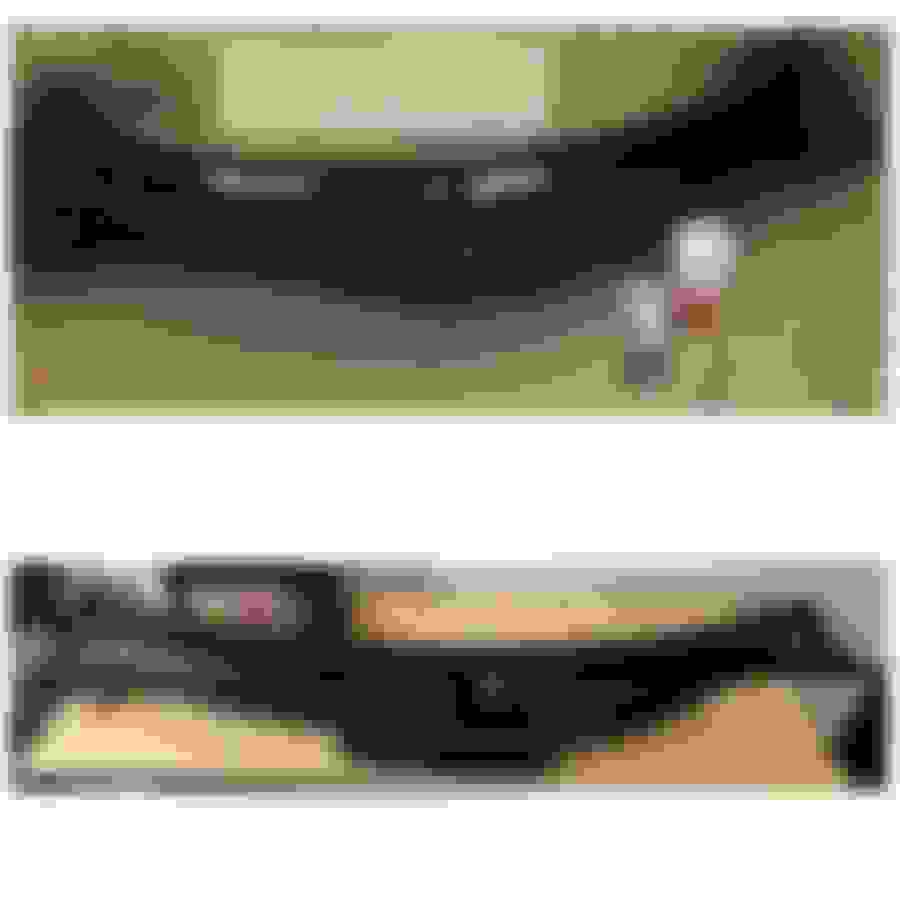
Hood Lift Support A.K.A. Hood Shock Replacement
January 22. 2024
This was a very easy job. I only used a small flat tipped screw driver and some long lasting grease.
Here are pictures that will hopefully be helpful to some new owners:
Belt Tensioner Idler Pulley Drive Belt Replacement
The tension is building!
January 29, 2024
With Svengoolie on the ground I decided to start replacing the engine wear items. This is all part of my 50,000 miles maintenance, even though I'm a couple of thousand short of it.
I replaced the Drive Belt, Belt Tensioner, Idler Pulley and the Belt Tensioner Damper.
The Belt Tensioner Damper (looks like a small shock absorber) is mounted to the engine block and the back of the Belt Tensioner. It's only found on manual transmission cars.
Here are some pictures with descriptions on how I did the work on my car.
Last edited by M60A3Driver; 05-25-2024 at 01:15 PM.
I am very impressed and enjoying your "journey".
Something for everyone to add to their knowledge of these unique cars.
I am amazed that you have the time to:
- do the work
- do the pictures and editing
- post with comments
I have been retired for 7 years now and although I do get a lot done, it pales in comparison to your efforts.
Perhaps you could also teach a time management course?
KEEP UP THE GOOD WORK!
Jim
Thank you for the kind words! I appreciate it.
I've noticed that once I got divorced I suddenly had a lot more time! LOL
Seriously, I've enjoyed working on cars since I was a teenager. This car however, is special too me.
I've been doing the "how to" posts on facebook for a while under the name "Giovanni Pace". So a lot of the pictures just needed some editing and revamping of some of the captions so people can see them better.
You'll also notice I'm a night owl. Some of these posts were finished around 2 or 3 in the morning. You can tell the late nights by the bad spelling!
I like trying to give back to the forum as well. I've learned a lot from others here and I want to help keep it going.
Alarm Siren Replacement and Drain Cleaning
Chirping like a bird now! (Part 1 of 2)
The journey with Svengoolie continues...
I split this into 2 parts because there are 20 pictures.
February 2 - February 9, 2024.
I decided to replace my alarm siren with a brand new one that I got. Now Sven actually chirps when I lock or unlock the car with the fob!
I also wanted to clean the drains, clean underneath the wiper cowl, paint the cowl and prepare for a new windshield.
My windshield was so pitted, it was like looking out of the view screen on the star ship Enterprise when driving at night! It was quite dangerous, especially when cars were coming at me. The glare was terrible.
Anyway, this is how I did the work on my car. The 2nd to last picture "Finished", was taken after the new windshield was installed. The next post will be about removing and replacing the surrounding trim.
I hope this will be helpful to other owners who haven't done this yet.
Last edited by M60A3Driver; 05-25-2024 at 12:48 PM.
Reason: Title change
Alarm Siren Replacement and Drain Cleaning
Chirping like a bird now! (Part 2 of 2)
The journey with Svengoolie continues...
I split this into 2 parts because there are 20 pictures.
February 2 - February 9, 2024.
Helpful tip that I forgot to mention; Before removing the wiper arms, put a piece of painters tape on them and label them, (Driver's side & Passenger side).
The passenger side wiper arm and blade are longer than the driver side. Also remember to tape their positions on the windshield. This will help when reinstalling them.
Last edited by M60A3Driver; 05-25-2024 at 12:49 PM.
Reason: Title change